Traditional Homemade Gobs

 Hello friends,

Here is my recipe for classic gobs.  This is our family recipe that we have used since the 1940's. The key for these delicious gobs is the soft texture of the cakes and the creamy homemade filling.  We use this boiled icing recipe for gobs and cakes. It has been a favorite for decades.  It is so much better than any of the usual gob fillings that use powder sugar, we really dislike those.  This filling is smooth, creamy and not as sweet but is such a great compliment to any moist cakes and cupcakes as well as our gobs.

I start the boiled base first as it needs to cool before making the icing.  So, if you do it before you start your gobs or cakes, it will be ready to mix the icing once the gobs cool.


Soapsmith's Traditional Gobs

Boiled icing - filling for gobs or icing for any cake - a family favorite for decades.  My Mom always made this icing because it uses regular pantry ingredients, nothing special.  She always had regular sugar on hand but didn't always have powdered sugar so she liked recipes that used whatever she had in the pantry.  

6 tablespoons of flour
1 1/2 cups milk

Mix together in a jar and shake well to incorporate
Strain into a pan to remove any lumps.  


Cook the flour milk mixture on the stove. 


Stir constantly, it only takes a few minutes to come together.
 Once it heats up you will see clumps/lumps of thickening, that is fine, 
just keep stirring being sure nothing is sticking to the bottom of the pan.  


Stir until the mixture resembles the texture of Crisco, very thick and smooth.


Set aside to cool.  I usually cover it with a towel and stir once in a while 
to avoid a skin from forming on the top.

1 1/2 cup sugar (regular sugar, not powdered/confectioners sugar)
2 sticks of margarine or butter
1/2 cup crisco
2 tsp vanilla

Once cool, combine all ingredients in mixer with whisk attachment if available and blend at low speed, then increase to high speed and beat until the mixture becomes lighter and fluffy and all sugar crystals are dissolved.  This takes quite a few minutes (5 to 10), I usually check it by tasting it to be sure there are no sugar crystals and texture is light and smooth. You can use a regular hand mixer but a larger kitchen aid type with whisk attachment works best. 


Gob recipe

4 cups flour
1/2 cup cocoa
1 tsp salt
1 1/2 tsp baking powder
1 1/2 tsp baking soda

2 eggs
2 cups sugar
1 cup crisco

1 tsp vanilla
1 cup buttermilk
1 cup boiling water

Bake 450 degrees for 5 to 6 minutes - I use air bake sheets with parchment paper

Use room temperature eggs and Crisco.  Cream the Crisco and sugar until well blended, add the eggs and beat until smooth and creamy.  (You can use regular or butter flavor Crisco, either one is fine.) Add vanilla.


Sift together the dry ingredients and slowly add the dry ingredients to the crisco sugar egg mixture alternating with the liquids with the mixer on low until all is evenly blended.


Once incorporated, up the speed on the mixer to medium and beat for a minute or two, scraping the bowl as needed.


 Drop by tablespoons evenly spaced on parchment line baking sheet. I use air bake sheets. Bake for 5 to 6 minutes at 450 degrees.  Cool before filling.  Sometimes I make them in a mini size, just use a teaspoon instead of a tablespoon to drop them on the baking sheet reducing baking as needed - cute!


Fill with generous amount of the icing.


I wrap them individually for freshness.  
I store them in the refrigerator and prefer to serve them chilled 
as the texture of the gobs and fillings is soft and delicate so chilling is ideal. 
They freeze well, too, just put the wrapped gobs into a freezer zip lock bag.


I hope you try these delicious treats.  So much better than any you will find in shops and stores, nothing beats homemade!

Thanks for visiting,
Bonnie

Soapsmith's No Knead Bread

 Hello Friends,


Homemade bread, such a luscious luxury, now a quick and easy version that yields a crusty and golden  outside, and soft and flavorful texture inside.


 No Knead Bread has been popular for quite a few years and it is truly easy with nothing much required but a little planning. 


The basic recipe is simple 4 ingredients:

Flour, water, yeast and salt.  

3 1/4 cups flour

1 to 1 1/2 tsp fine sea salt

1/2 tsp yeast 

1 1/2 cups warm water (105 to 110 degrees)

Notes:  You can adjust the recipe to your tastes. Add a teaspoon of honey, sub some of the flour with whole wheat, oat flour or rye flour, add flavorings like garlic, parmesan cheese, spices, onion powder, seeds, everything bagel topping or nuts etc.


1. In a large mixing bowl, combine the dry ingredients, stir to combine, add the warm water and stir with a spatula or wooden spoon to form a loose dough.  No need to overwork it, just be sure it is all incorporated.


2. Cover the bowl with plastic wrap and a towel. and let the dough rest and rise at room temperature for 12 to 18 hours.


3. The risen dough will fill the bowl. 


Empty the bowl to a well-floured surface. 


Stretch the dough and fold it to the center pulling the outer edges into the center about 8 times until the dough tightens up and form a round dough ball. 


Place the ball on a piece of parchment paper keeping a nice ball/circle shape. Loosely cover the ball with plastic wrap and allow it to rest while the oven heats. 


4. Place your Dutch oven inside of your oven.  Heat the Dutch oven at 450 degrees for 30 minutes while the dough rests.   Using a sharp knife, gently cut shallow slits into the top of the dough to get a nice artisanal top crust that will crisp and curl during baking. 

I use a cast iron Lodge Dutch Oven but an enameled one will work, too. I have read that you can also bake it on a pizza stone but you won't get the same crust results as the Dutch Oven offers a different environment in the oven.


5. Use oven mitts to remove the Dutch oven from the oven, be careful as it will be very hot.  Lift the edges of the parchment to carefully transfer the dough ball and parchment to the Dutch oven.  


Cover with the Dutch oven lid and bake at 450 degrees for 30 minutes. 


 Remove the lid and bake for 10-20 more minutes, until the crust of the bread is to your liking - golden brown or darker crisper.


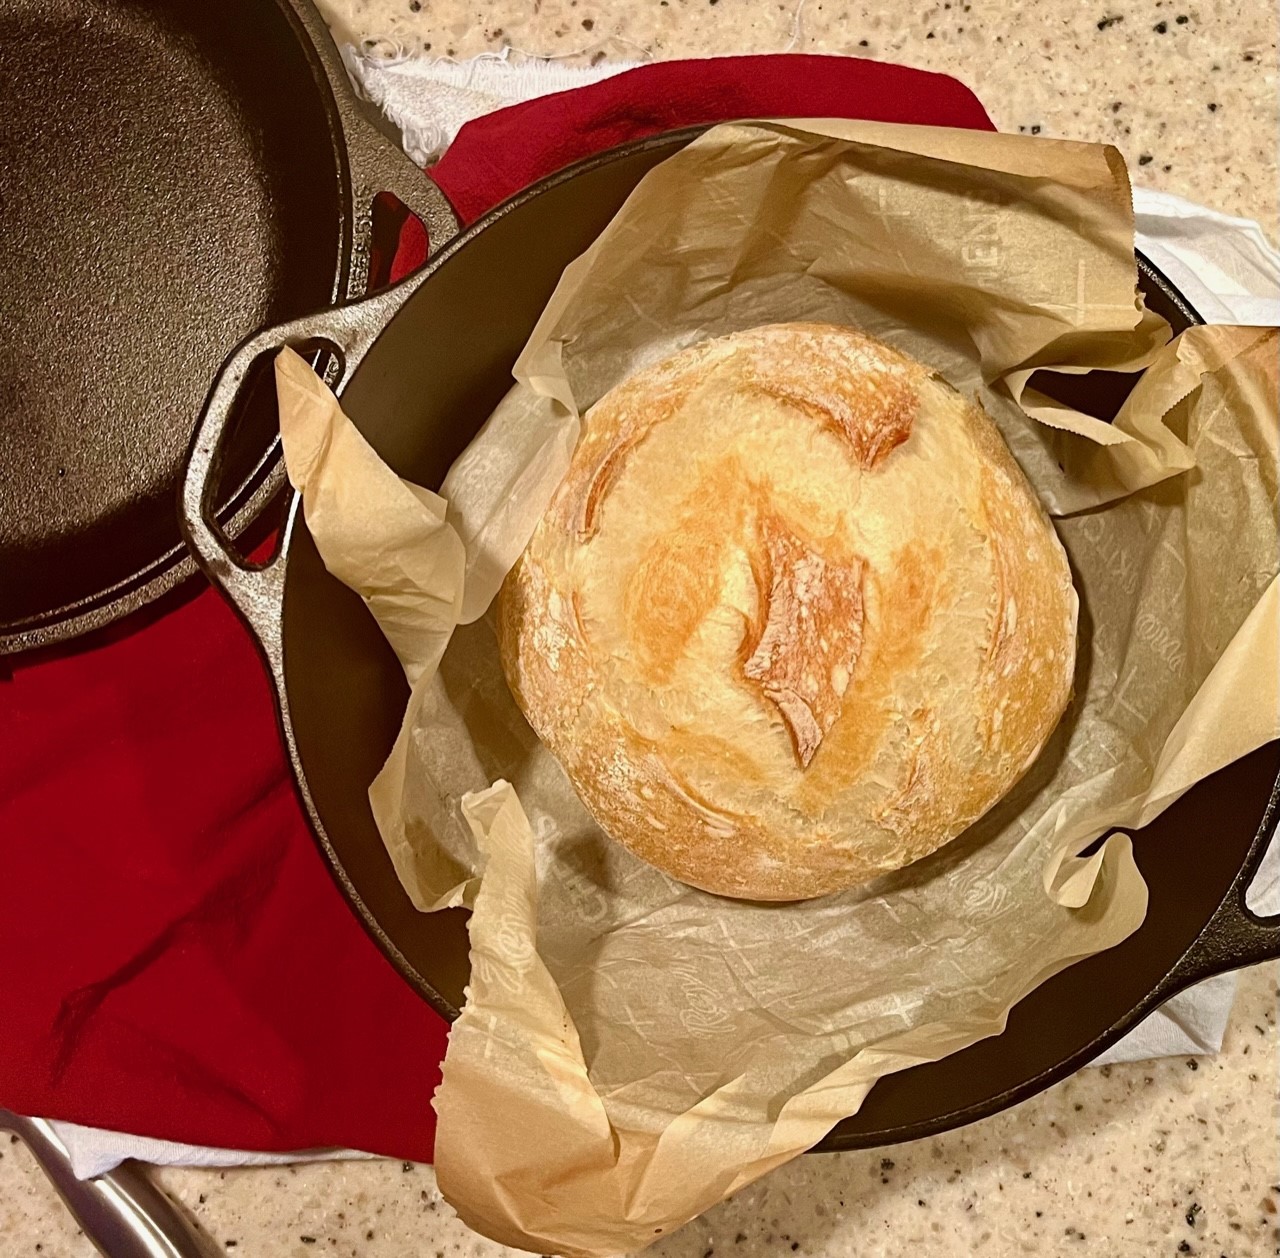
6. Remove from the oven, carefully lift the parchment paper to move the bread to a wire cooling rack.


You can add melted butter to glaze the crust if you like. Cool for at least 30 minutes before slicing.


 I love it warm with a slathering of fresh Amish Churned butter - comfort food at its finest. Wonderful compliment to a fresh salad, warm stew or hardy soup on a cold Winter day. The open crumb texture makes a great toast, too. Lots of places to nestle that melted butter. Enjoy!


Thanks for visiting,

Bonnie


Happy St. Nicholas Day!

Hello Friends,


The celebration of St. Nicholas Day is a tradition in our home.  Whenever we have a "new" child enter our family, I like to introduce them this old world custom.  


Over the years many children and some adults have learned about St. Nick: Tom, Rob, Brian, Luca & Niko, Bentley & Wyatt, Christie, Zach & Quinn, Kristen, Michaela & Kamryn, Michelle, Ashley, Tucker, Melissa, Alyssa, Ayden, Roman & Athena,,, with new ones each year .  They will receive a care package delivered just in time for December 6th.


 Dear Boys,


I wanted to share you with the story of St. Nicholas.  December 6th is St. Nicholas Day.  Every year, children around the world celebrate this special day in honor of a great man – St. Nicholas.


Now, I am sure you are familiar with the magical fellow known as Santa Claus.  Listen to the story of St. Nicholas and see if it sounds familiar to you.

Nicholas was just a young boy when his father died.  His father was rich so Nicholas had a lot of money.  He went to live with his Uncle.  He was a very kind person who always tried to help people.

He lived in a country called Turkey.  There were many very poor people in his village.  He didn’t like having money when others were in need so he would secretly help them.  There was a family so poor they were going to have to become slaves because they didn’t even have money to buy food.  Nicholas heard about them and decided to help.  The girls would wash their socks at night and hang them by the fire to dry.  Nicholas secretly dropped gold coins into the socks and saved the family.

He did not want people to know so he did this in secret.  As time went on, he continued to help wherever he would see a need. 


He started helping all of the poor people in the village.  He especially liked helping children.  Many were hungry with little food.  Children would leave their shoes outside their doors at night.  Nicholas would sneak in and fill their shoes with special treats.  He often gave fruit and nuts, sweet treats and gold coins. When he couldn’t get into the house, he would drop the gifts down the chimney.


 He kept book about the children’s behavior and carried it with him where ever he went.  When he knew a child was being unkind or getting into trouble, he would leave them a bundle of switches or a lump of coal instead of treats in hopes that they would change their ways from bad to good. 


He had a long white beard and because he was a Bishop, he wore a red cape.  Does that sound like anyone you know about?  Yes, indeed, St. Nicholas – who was a very real, compassionate gentleman – became the legend we all know as Santa Claus! White Beard, Red Cape, Naughty and Nice list, presents, gifts in stockings, chimney, lump of coal and all!  He didn’t have reindeer but he rode around on a white horse.  Now, St. Nicholas didn’t have any magical powers like Santa because he was just an ordinary person just like us, but he always was so very kind and generous to everyone he met. We, too, can be inspired by his good works and always strive to help those who are less fortunate than us.


 When Uncle Rob and his brothers were little, they always found their shoes filled with treats on the night of December 6th.  Even today, they are grown men, they still get a pack of Chiclets, beef jerky, chocolate coins and a peanut butter melt away Santa on St Nicholas Day.   Uncle Rob even got them as a special care package when he was overseas with the Marines.  St. Nicholas never forgets anyone!


I wanted to share some special treats with you on this St. Nicholas day.  I hope you enjoy them.  Remember to always be good and kind – especially to others who need your help – just like St. Nick and Santa, too. 

Have a happy holiday!

See you soon,

“Aunt Bonnie”


Soapsmith's Homemade Lump of Coal Candy

INGREDIENTS

2 cups granulated sugar
2/3 cup light corn syrup
¾ cup water
1/2 teaspoon LorAnn candy oil flavor of your choice 
1-1/2 teaspoons black gel food color

DIRECTIONS

Line 8" X 8" baking pan with aluminum foil allowing foil to overhang sides. Spray with non-stick cooking spray. I have silicone lump of coal molds that can be used if you have them, if not just use the pan and break it up after it hardens.

In a 2-quart heavy bottom saucepan, mix together sugar, corn syrup, water . Stir over medium heat until sugar dissolves. Insert candy thermometer if using, making certain it does not touch the bottom of the pan. 

Bring mixture to a boil, without stirring. At the start you can "wash down" any sugar crystals that form on the sides of the pan with a wet pastry brush. Just do this once early on.

Add gel colorant when syrup reaches 260º F. Do not stir. Boiling action will incorporate color into syrup. 


Continue to cook and remove from heat at 300º F or until drops of syrup form hard, brittle threads in cold water. When it stops boiling, add flavor and stir.  Be careful, it is very hot and will steam up when you add the flavor.


Pour syrup into prepared pan. Cool completely on counter, don’t put in the refrigerator. Once candy is cooled, lift from pan and remove foil.  

Break candy into small chunks to simulate coal pieces.  I put it in a heavy zip lock bag and hit it with a mallet.  Store in air tight container.   Enjoy!


These were made in the silicone molds.


Thanks for visiting,

Bonnie